Sunday, October 20, 2013

Galaxy nails

Hola chicas! Hoy les traigo un nailart de uñas galácticas que hice. Sin embargo, fue casi imposible sacarle fotos decentes, por eso solo hay una en este post. Es muy sencillo hacer este nailart, sólo se necesita una esponja cortada en pequeños trozos para ir aplicando el color más precisamente (yo usé una esponja de cocina brutalmente mutilada con una tijera jajaja). Creo que la parte más díficil es elegir qué colores de esmalte usar. Espero les guste, gracias por leer :)

Hi girls! Today I bring you my first galaxy nails manicure. I'm really happy with how this turned out, even though I'm already thinking of ways to improve them for the next time I do one.

Galaxy nails are basically made by sponging several different polishes and adding white dots, or glitter (or both, in my case) to create a cosmic-like art.

Sadly, this was impossible to photograph, I don't know why, so you only get one shot of this. Sorry! :(


For the base I painted two coats of Essence Galactic Black, a shimmery black from their old collection. Then over it I sponged several colors to create the nebulas, always starting with Finger Paints Papier Maché so the other colors would show better:

Essence Passion for Fashion and Jordana Silky Purple for the purple nebulae
Essence Viva la Green and A-England Galahad for the green nebulae

Finally, I added some dots with a dotting tool and Papier Maché and topped it all off with a sparkly holographic glitter top coat (Etienne Disco Glitter, which is a mix of micro and hex holo glitter, similar to China Glaze Techno).

Have you tried galaxy nails? Link me your manis in the comments, I'd love to see what you've done. Thanks for reading! :)

Sunday, October 13, 2013

Twinkling Golden Stars

Hi girls! How have you been? I hope your weekend was good. It was good for me, I had time for relaxing and writing some letters, but I digress, let's get to the polish.

Today I bring you a stamping manicure I did with my newly arrived MoYou London plate. For some reason I had been wanting a plate with traditional japanese fabric patterns, but it was impossible to find one (strange craving, huh?). That was until someone mentioned MoYou London on a group I'm in, and while browsing  -BAM!- there it was, my stamping dream came true.

Here you can see the plate, which is quite large compared to the other plates in my collection (mainly Bundle Monster, Nailz Craze and Essence). The designs on the plate are on the smaller side, which is a plus for me since my nails are tiny, but on the site you can also find plates with larger designs.

My plate is from the Suki collection, which focuses on japanese motifs (from kawaii -cute- designs to these more traditional ones), but the site has a varied array of themes and designs, from full nails to small individual images. They also have these plates that consist of a big composition with different details so you can pick and choose which to use on your nails (like this).

The plates come in a re-sealable plastic bag, with blue film attached to it (which you have to remove before using) and adhered to a sturdy base (I think to avoid cuts with the sharp edges?). The designs are well etched so the stamped image is very crisp.

You can get this plate at the MoYou London website. They ship from the UK, but I didn't had any problem getting my order here. I'm not affiliated with this company in any way, I just loved their designs and look forward to adding other plates to my collection.

Now, for the mani, yay :)


I used a base of Nails Inc Baker Street, which is an amazing bright cobalt blue I've already shown here before (click here for the review). Then, I stamped over it with Orly Luxe which is great for stamping, but leaves my fingers full of sparkly particles. The pattern that I used is called "Asanoha", which reminds me of stars.


To finish off my mani, I topped it all with OPI Matte Top Coat, which was recently released in my country. I love the effect it gives to my manis, it's a true matte finish and dries very quick.

Do you like stamping? It was hard for me to pick up at first, but eventually I succeeded (sometimes it pays to be stubborn heh heh).

Thanks for reading! :)

Wednesday, October 9, 2013

Oldies but Goodies

Hola chicas! Hoy traigo un nailart bien sencillito hecho solamente con una herramienta: cinta adhesiva, o scotch (específicamente el de 3M que viene en un empaque verde). Simplemente apliqué una base de OPI Suzi Says Feng Shui y, cuando estuvo bien seco (pero "seco seco" jajaja) enmascaré unas partes con scotch y pinté dos capitas de Orly Ingenue. Bueno, bonito y barato. Espero les guste! :)
Hi guys! How have you been? I hope Spring (or Fall) is treating you well. Today I bring you a very simple tape mani with two of my favorite nail polishes of all time, OPI Suzi Says Feng Shui (from the Hong Kong collection from a few years back) and Orly Ingenue (from 2012's Holiday collection). So let's get to it~

To start, I applied 2 easy coats of OPI Suzi Says Feng Shui over OPI Natural Nail Base Coat. This is probably my favorite blue ever, and I own a lot of blue nail polishes. It's also the first polish I ever ordered online, so it has a special place in my heart.


In order for tape manis to work properly you need your base color to be really dry before moving on to applying the second color. I leave the color as is for a day and, on the second day, apply the tape to be extra sure.


So, I masked out the sides of my base with scotch tape, so it'd form a triangle through the middle of my nail, and then applied Orly Ingenue in two thickish coats (I only left it dry for a few seconds before applying my second coat, was just building opacity). Then I removed the tape right away as I've found that removing the tape as soon as possible gives the best results for neater lines.

The I topped it off with OPI's Top Coat and some Essence quick-drying drops and I was good to go!

I hoped you liked this mani, thanks for staying with me. Have you tried tape manis? What is your favorite design with tape?


Thursday, August 29, 2013

Nails of the Past Days

Just so you know I didn't fall off the face of the earth, here are some pics of my past manicures. Hope you like them :)

Essence Very Cherry from the Fruity collection and Jordana Silky Purple for the sugar spun effect. This sugar spun mani is harder than it looks!
Lime Crime Pastelchio and accent stamped with Konad Black using the birds from the Essence 01 Have Fun! image plate.
OPI Is that Silva? Using the new Essence magnet I picked up in my last haul.
Speaking of, we finally got the new goodies from Essence, the release from March/April I think and I went a bit crazy :) I only got one of the magnets, considering that the previous ones weren't really that good but now that I tried one and it works well, I'm decided to get the other designs (and some shades of magnetic polish heh).
That is all for now. Thanks for stopping by and see you soon :)

Tuesday, July 2, 2013

FOTD: Blue Eyeliner

Hola chicas! El post de hoy es un FOTD (Face of the Day o, literalmente, Rostro del Día) y es para compartir un look que hice hace un tiempo y me encantó, por lo que lo recree para postearlo hoy. Lo principal del look es el delineado en azul, que se lo ví a una amiga y me encantó (de hecho, ella fue tan amable de enviarme el que usó ella). El resto del look es bien sutil: en el párpado usé sombra rosa pálido y palo rosa para acentuar. El rubor y el labial son también muy muy sutiles, apenas se notan. En fin, les dejo la lista de productos al final. Muchas gracias por leer!
Hi guys! Today will be my first Face of the Day (FOTD) post. Are you excited to meet the face behind the nails? I'm a bit nervous to put myself so out there, but here we go.


Today's look focuses mainly on the blue eyeliner. I saw this on a friend's blog and loved it, and she was so kind to send me the product she used. It's a cream eyeshadow by Kiko that it's also promoted to work as gel eyeliner (though it's a bit harder to work with than my Catrice gel eyeliners).


Besides the blue eyeliner, the look is very simple and subtle. I used a very pale pink eyeshadow on the lid and a darker pink/maroon on the outer lid/crease. Lips are a very subtle shimmery shade and my blush is so subtle you can't even notice it here.

So all in all, here's the list of products I used:

Eyes


  • Too Faced Shadow Insurance
  • Too Faced Candy Rose eyeshadow (lid)
  • Sigma Elysées eyeshadow (outer lid/crease)
  • Too Faced Vanila eyeshadow (browbone)
  • KIKO Colour Shock 06 Lagoon Blue cream eyeshadow (liner)
  • Maybelline The Falsies Flared waterproof mascara

Face

  • Maybelline Super Natural Mat foundation in Nude 21
  • Essence PureSkin Cover Stick concealer in 01 Beige
  • Catrice Multicolor Blush in Riviera Rose
  • Essence Fix&Matte translucent loose powder

Lips

  • Maybelline Color Sensational lipstick in 005 Pink Sand
I hope that you liked this look, even though it's far from being perfect. Thanks for reading and until next time~

Sunday, June 30, 2013

Beyond nail polish

Hola chicas! He estado pensando en expandir un poco mi blog, que hasta ahora ha sido exclusivamente de esmaltes y nail-art. Pero con mi afición a los esmaltes nació el interés por el maquillaje. No es que sea experta ni nada, pero me encantaría compartir este viaje de aprendizaje con ustedes, así que voy a empezar a postear reviews o "looks" ocasionalmente. Aún estoy trabajando en los detalles técnicos (porque sacarse fotos una misma con una dSLR no es tan fácil como parece jajaja) pero ya tengo algo listo para el próximo post, así que estén atentas por favor. Muchas gracias por leer!

Hi guys! Sorry it's been a bit quiet here. I am still doing my nails, but since it's winter, they're not in the best shape and I feel kinda ashamed to take pics (last post took forever to get done). Anyway, today's post is to let you know that I've been thinking about branching out this blog to other types of makeup beyond nail polish.


A couple years back I bit my nails very hard and had really low self-esteem.  Letting my nails grow changed all that and, thanks to my love for nail polish, I started looking at other kinds of makeup. I am by no means an expert, but I'm always learning and I'd like to share my learning process with you guys.

I'm still working on the technical side of it. Taking self-portraits with a dSLR is not as easy as one might think LOL. But I already have something ready for my next post, so please stay tuned. Thanks for reading!


Saturday, June 29, 2013

Butter London Knackered

Hola chicas! Hoy les traigo el último de los Butter London que recibí a finales de Enero (ufff!!). Butter London es una marca de esmaltes proveniente de USA, B3F y cruelty-free. Knackered es un color tornasol verde-violeta con partículas holográficas y una base ligeramente tintada, pero que no es opaco por sí mismo (por lo que use Victoriana, de la misma marca, como base). Actualmente estos esmaltes no es posible conseguirlos en Chile -hasta donde yo sé-, pero en USA lo venden en tiendas como ULTA, Sephora y Nordstrom.

Hello girls! Today I bring the last of the Butter Londons I received way back in January. Knackered is a green-violet duochrome with holographic glitters in a sheer, tinted base. Or in Butter London's words (from their site): "A sheer, twinkling oyster shade flecked with micro glitter particles. This duochrome nail lacquer is sure to please"

I took so much in taking pics of this polish because I really had a hard time finding the perfect base for it. I tried black, indigo blue, silver, dark grey, medium and dark teal, etc. While all those combinations were really pretty, none satisfied my wish for it to look on my nails like it did in the bottle. In my frustration I asked Makeup Up Alley's Nail Board for suggestions and someone recommended Victoriana. And behold, it's perfect!


For this pictures I used one coat of Knackered over two coats of Victoriana along with my regular favorites: Essence Studio Nails 24/7 Nail Base and Better Than Gel Nails Top Sealer.

This polish reminded me a lot of Ascalon in the sense that it's never boring. While in the shade/indoors the duochrome is very eye-catching and visible and then, when you're outside in the sun, the holo sparkles and the violet shift catch you by surprise so it's never boring. Also both are violet-to-green duochromes with holographic sparkles, but Ascalon's base is much more gray and opaque and the holographic effect is a little more linear.


The holographic sparkle was a bit shy on my pictures because we barely had any sunshine the day I took these, but is very visible under direct daylight.

Blurry shot to show sparkle -sorta

Anyway I hope you liked this combination and give Knackered a second chance if it's frustrating you as much as it did to me.

What's the polish you've had more trouble with but you were determined to make work?

I have a surprise for my next post, so stay tuned. Hint: it's not about nail polish! Until then, take care and thanks for reading~

Monday, April 29, 2013

Butter London Two Fingered Salute

Hello girls! How have you been? Is summer in full swing where you live or are you taking the coats out for winter like myself? From what I've read on Twitter some of you are having winter weather still well into spring. I hope that, wherever you are, you're making the most of it by wearing pretty nail polish ;)

Today I want to share with you another of my Butter London beauties (I kinda fell off the face of the Earth doing these, huh?). This is the beautiful Two Fingered Salute. I saw it blogged from A Polish Addict and fell in love. So. Hard.

Butter London in unavailable where I live (which by now you probably think it's Siberia because of our crappy nail polish selection) but I got this one thanks to a kind penpal/nailmail buddy. But enough rambling, on to the polish!


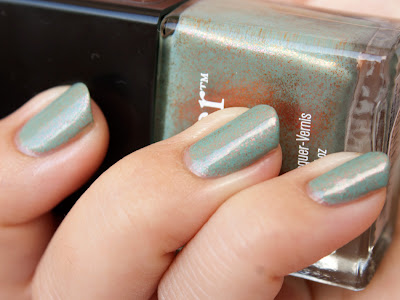
Two Fingered Salute is a dusty, kinda like a seafoam, green base with tiny shimmer that shines copper, pink and gold. It's truly outstanding.


Here I think you're seeing two coats over my regular basecoat (Essence 24/7) and topcoat (Essence Better than Gel Nails Top Sealer). Sorry, it's been a while since I took these pictures heh.


I do remember that the formula was really easy to work with, like with all the butter London polishes I've tried so far. I love how it looks like some sort of subtle speckled effect, the color shifting of the shimmer adds so much to it too. Next, in the macro, you can kinda see all the sparkly colors the shimmer turns.


Butter London retails for $14 in the US, for 15ml bottles, at places like Ulta and Nordstrom. They're also cruelty-free, yay!

I hope you enjoyed this simple mani/review. Next one will be a totally different thing, as I kinda fell off the Butter London bandwagon, but I do want to finish up this series of reviews at some point, so stay tuned.


Thursday, February 21, 2013

Butter London Victoriana

Hi guys! I'm back again to share another Butter London, as suggested by Kumiko who wanted to see Victoriana next from my Butter London Haul.

Victoriana is a muted/dusky teal filled with tiny silver microglitter. It's probably my favorite of the ones I've used so far, having worn it twice in the few weeks.


For my mani I used two coats of Victoriana over a base of Essence's 24/7 basecoat and topped it with Better Than Gel Nails Top Sealer from the same brand. Formula-wise it was good, a bit draggy on the first coat but it evened out nicely, and totally opaque, on the second

The base color is tricky, not quite blue and not quite green, and I love these kind of colors. The silver microglitter adds such a nice depth and "oomph" to the look. Just check out the macro:

BAM! This one is a winner in my book and total Top 20 material.

Thanks for reading and see in the next Butter London review :)

Saturday, February 16, 2013

Nail Mail: Butter London & Fiddlesticks Review

Hi girls! Long time, no see, sorry about the hiatus, between summer vacation, a road trip and a couple more things I did felt much like taking and editing pics of my manis (though I still kept painting my nails regularly).

Anyway, today I want to share with you the first of 5 Butter London nail polishes that I recently got thanks to a couple of lovely ladies that got them for me in the US and sent them my way.

The shades I picked were: Fiddlesticks, Knackered, Disco Biscuit, Victoriana and Two Fingered Salute. I've already worn and loved Victoriana and Disco Bicuit, but I didn't take pics. I did take some of today's mani, which is Fiddlesticks.

Butter London Fiddlesticks was released in the 2012 Holiday collection ands is  a magenta jelly base filled with tiny pink glitter.

It applies really well and is opaque in 2 coats, for this mani I used the Essence Peel Off Basecoat (will come back to let you know how did that go) and 1 coat of Gelous and one coat of Essence Better than Gel Nails Top Sealer (new favorite top coat!) to top it off and leave it smooth as glass.

So, to be my first Butter Londons, I'm extremely happy with this new brand. The formulas on the ones I've tried so far are excellent and Fiddlesticks was no exception. A little hungry, like most glitters, but not bad.

Which one would you like to see next?

Thanks for reading and keeping up with me :)